
Intune
Filters for Managed/Unmanaged Devices
Device type targeting for App Protection/MAM Policy in Intune has now been moved to the Assignments step in policy creation.
Now we can use Filters to target the device type (Managed/Unmanaged) while assigning a MAM policy in Intune.
Follow the below steps to create a Filter for managed/unmanaged devices –
1. Sign-in to the Intune admin center.
Select Tenant administration > Filters > Create.
You can also create filters in:
• Devices > Filters
• Apps > Filters
Or, Go here Tenant admin – Microsoft Intune admin center
(It is important to remember that the filters are available for –
• Managed Devices: Devices enrolled in Intune &
• Managed Apps: Apps which are managed by Intune (suitable for unenrolled BYOD devices))

2. Click on Create > Managed apps

3. Input the Filter Name, Description and Select and Platform.
4. Click Next

5. In Rules, Select deviceManagementType property Equals to Unmanaged (For Unmanaged devices) like in the following screenshot:
(For Managed devices- Select deviceManagementType property Equal to Managed)

Click Next and Create the filter.
Once you have created the filter go to an App Protection Policy for that platform and assign the filter by clicking on edit filter.

Restrictions :
There are some general restrictions when creating filters:
• For each tenant, there can be up to 200 filters.
• Each filter is limited to 3072 characters.
• For managed devices, the devices must be enrolled in Intune.
• For managed apps, filters apply to app protection policies and app configuration policies. They
don’t apply to other policies, like compliance or device configuration profiles
Filters for Managed/Unmanaged Devices Read More »
Set up the MDM Push Certificate
An Apple MDM Push certificate is required for Intune to manage Apple devices (iOS/iPadOS & macOS). After we add the certificate to our Intune tenant, our users can enroll their devices using:
- The Company Portal app or
- Apple’s bulk enrollment methods like ADE
To Set up the MDM Push certificate –
Go to Devices -> Enroll devices -> Apple Enrollment
Click on Apple MDM Push Certificate

Tick the check box I agree (To give Microsoft permission to send data to Apple.) in Step 1.
Click on Download your CSR to download and save the request file locally (The file is used to request a trust relationship certificate from the Apple Push Certificates Portal) in Step 2.
Go to Step 3 and Click on Create your MDM push Certificate to go to the Apple Push Certificates Portal

Sign in with your Apple ID.
(Record this ID as a reminder for when you need to renew this certificate.)
Click on Create yours now to create a new Apple ID, if you don’t have one already.
Note: Make sure to use or create an Enterprise account rather than a personal Apple ID. Keep in mind that the account you use should be one that is easily shared or transferred in the case that the person setting up the MDM push Certificate leaves the company or moves teams.

Click on Create a Certificate.

Tick the check box I have read and agree to these terms and conditions.
And click on Accept button.

Select Choose File and browse to the CSR (certificate signing request) file downloaded in step 2.
and then choose Upload.

On the Confirmation page, choose Download to download the certificate (.pem) file and save the file locally.

Now Go to Intune portal again and Enter the Apple ID (used to create your Apple MDM push certificate) in step 4.
Now go to step 5, Click on Select a file under “Browse to your Apple MDM push certificate to upload” section, select the certificate (.pem) file, choose Open, and then choose Upload.

And your MDM Push certificate Setup is complete.
You can check the certificate details by Clicking on Apple MDM Push certificate.

Now you see, all the enrollment methods and options are available to configure.

Note:
1. The Apple MDM push certificate is valid for one year and must be renewed annually to maintain iOS/iPadOS and macOS device management. If your certificate expires, enrolled Apple devices cannot be contacted.
2. When a push certificate expires, you must renew it. When renewing, make sure to use the same Apple ID that you used when you first created the push certificate. If you request a new certificate instead of renewing your existing certificate, you will be forced to unenroll and re-enroll all of your existing iOS devices.
Renew Apple MDM Push Certificate
In Intune Portal, go to Devices -> Enroll devices -> Apple Enrollment
Click on Apple MDM Push Certificate
Click on Download your CSR to download and save the request file locally in Step 2.
Go to Step 3 and click on Create your MDM push Certificate to go to the Apple Push Certificates Portal or click on https://identity.apple.com/pushcert/
Sign in with the same Apple ID that you used when you first created the push certificate.
Find the certificate you want to renew and select Renew.

On the Renew Push Certificate screen, provide notes to help you identify the certificate in the future, select Choose File to browse to the new request file you downloaded, and choose Upload.

On the Confirmation screen, select Download and save the .pem file locally.
Now Go to Intune portal again and Enter the Apple ID (used to create your Apple MDM push certificate) in step 4.
In step 5, Click on Select a file under “Browse to your Apple MDM push certificate to upload” section, select the certificate (.pem) file, choose Open, and then choose Upload.
Your Apple MDM push certificate appears Active and has 365 days until expiration.
Note: A Certificate can be identified by its UID. Examine the Subject ID in the certificate details to find the GUID portion of the UID.
Or on an enrolled iOS/iPadOS device, go to Settings > General > Device Management > Management Profile > More Details > Management Profile. The second line item, Topic, contains the unique GUID that you can match up to the certificate in the Apple Push Certificates portal.
Set up the MDM Push Certificate Read More »
Connect your Intune tenant to Managed Google Play account
To enroll Android device with Android Enterprise we must connect our Intune tenant to Managed Google Play account.
To connect Managed google play account with your Intune tenant-
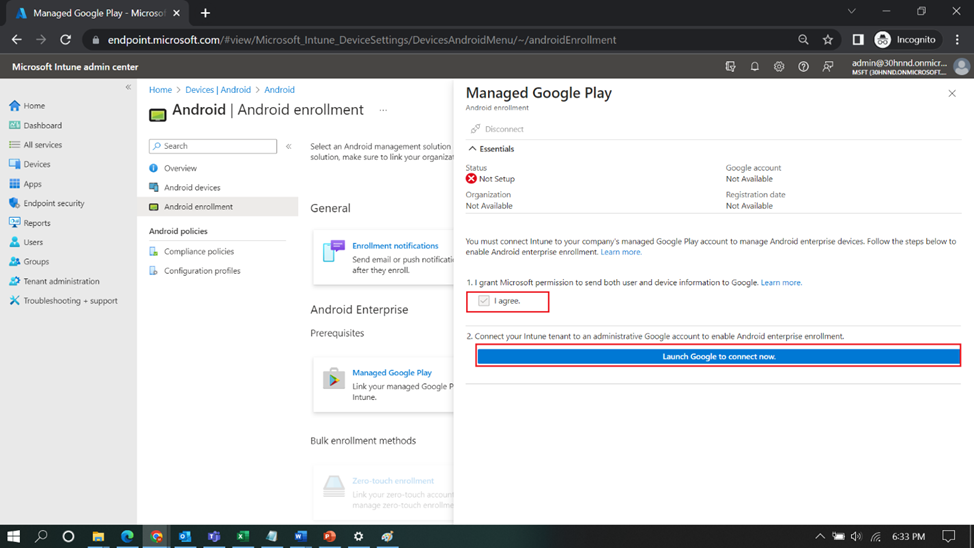
Go to Devices-> Android-> Android Enrollment
Click on Managed Google Play Option

Tick the Check Box “I Agree.’
And click on “Launch google to Connect now”
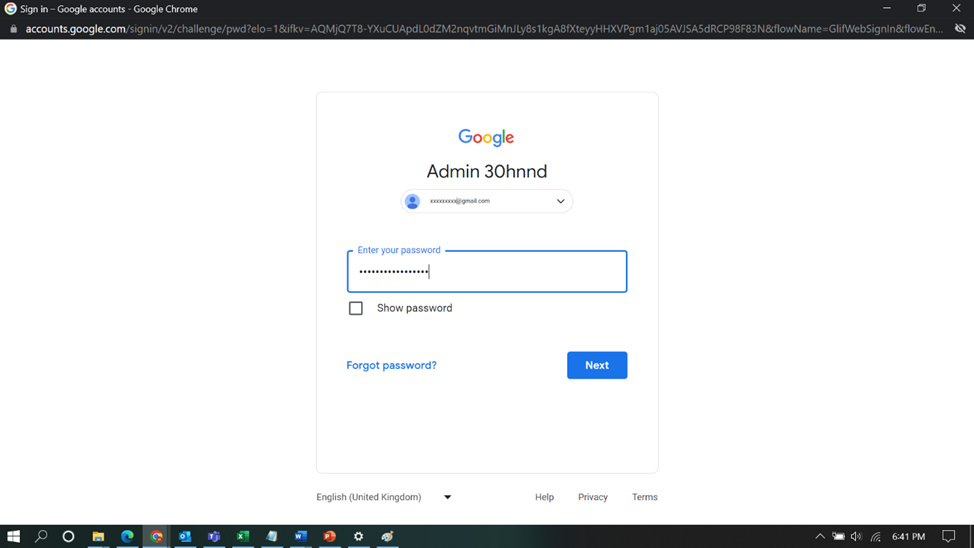
Note: Make sure you are not signed-in with any Gmail ID in your browser else it will connect with the same Gmail account or better do it in Incognito Mode.
Click on Sign in

Sign in with an Enterprise account mail ID (You can create the new one, if don’t have already)
Note: Make sure to use or create an Enterprise account rather than a personal Gmail account. Keep in mind that the account you use should be one that is easily shared or transferred in the case that the person setting up the Managed Google Play connection leaves the company or moves teams

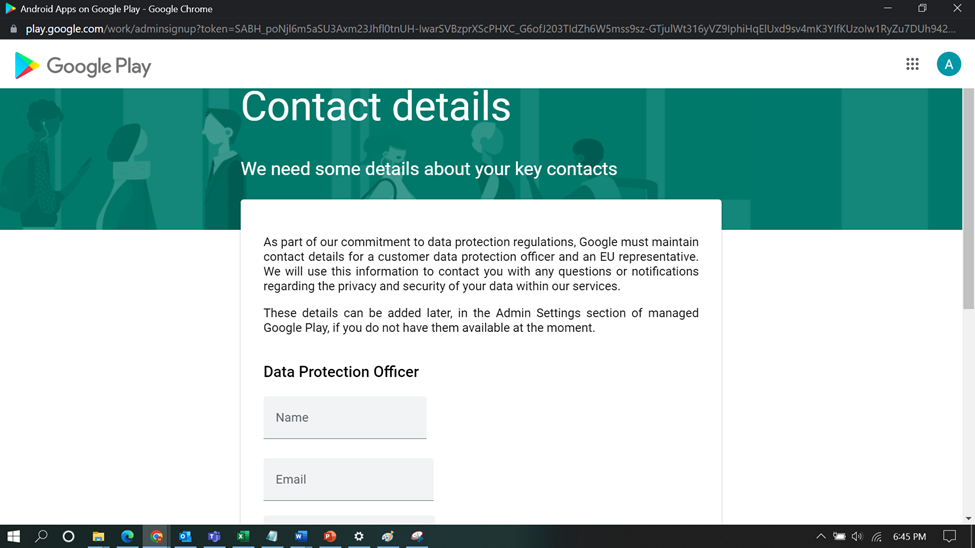
Once Signed-in, It will prompt you for your Bussiness Details

Put your Domain/Bussiness Name and Select the EMM Provider.

Put the Contact Details. This details will be used to contact you for any security or privacy concern.
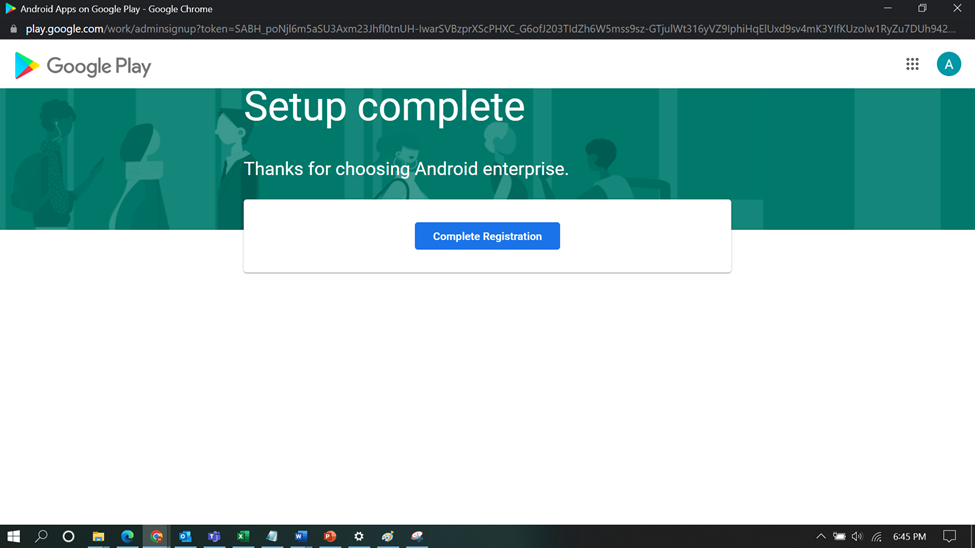
And your Setup is complete.
You can check the Connection details next time you click on Managed Google Play

Connect your Intune tenant to Managed Google Play account Read More »
Device Management Solution/Method for Android
Intune provide us following Device Management Solution/Method for Android:
1. Android device admin
Android device admin is legacy management solution
In 2010, Google™ released Android 2.2 (Froyo) with the ability to support the management of mobile devices via AndroidTM Device Administrator.
In the decade since, remote work rose along with the overall needs of the enterprise, enterprise mobility became more complex, the Android Device Admin application programming interface (API) was being asked to do more than it could.
2. Android Enterprise
Android Enterprise supports far more deployment scenarios and provides better security, privacy and configuration options on Android devices.
This is a Google-led initiative to enable the use of Android devices and apps in the workplace. The program offers APIs and other tools for developers to integrate support for Android into their enterprise mobility management (EMM) solutions.
Refer Android device administrator vs Android Enterprise to check more difference between Device Admin and Android Enterprise
Android Enterprise enrollment types :
- Android Enterprise Personally-owned Work Profile (BYOD)
- Android Enterprise Corporate-owned Work Profile (COPE)
- Android Enterprise Fully Managed (COBO – Company Owned/Business Only)- Intended to be shared by more than one user.
- Android Enterprise Dedicated Devices (COSU – corporate-owned, single-use)
Prerequisites:
1. Managed google play account needs to be connected with Intune tenant.
To enroll your Android device with Android Enterprise you must connect your Intune tenant account to your Managed Google Play account. Refer Connect your Intune tenant to Managed Google Play account to connect Managed google play account with your Intune tenant.
2. Devices must:
Run an Android build that has Google Mobile Services connectivity.
Have Google Mobile Services available and be able to connect to it.
Setup:
1. Android Enterprise Personally-owned Work Profile (BYOD)
Use personally-owned devices with work profiles to manage corporate data and apps on user-owned Android devices
Setup:
By default, personally-owned work profile devices enrollment is enabled so no further action is required.
Device Enrollment experience:
2. Android Enterprise Corporate-owned, Fully Managed user devices (COBO)
With this management mode the IT Admin takes full control of the device, unlike with work profiles.
This enrollment method can be used to enroll and manage corporate-owned devices. A fully managed device is associated with a single user and is intended for work, not personal use
Setup:
1. Create a new Enrollment Profile–
Go to Devices-> Android-> Android Enrollment
Tap on Corporate owned, fully managed user devices.

Click on Create Profile

Put the Name and the Description

Select the Scope Tag (Optionally, apply any desired scope tags) and then select Next.

Click on Create button.

An enrollment token will be created. During enrollment this token is needed to let the users scan the code and enroll their device.


2. Create Dynamic security group with the following rule
Property: enrollmentProfileName
Operator: Equals
Value: Enter the name of the enrollment profile you created
3. Create a Device Restriction Profile (Check options available for Corporate owned fully managed) and assign it to Security group
4. Create a Device Owner Compliance policy (Since the second preview of Corporate owned, fully managed user devices the Device Owner Compliance policy option is available.)
5. Approve and assign Android and other applications
Device enrollment experience – Corporate owned, fully managed user devices (COBO)- Device enrollment experience for end user
Note: It requires Android 8.0 or higher version.
Installation of applications is done without the need of a (personal) Google Play account. You`re signed in to the Google Play store with a Google for Work account automatically.
3. Android Enterprise Corporate-owned with work profile (COPE)
This is the latest addition for Android enrollment options in Intune. Using this profile, you can enable personal use on Corporate-owned Android devices.
Features:
Required apps can be installed without interaction of the end-user in the work profile.
All company contacts, data and apps are stored in the work profile.
App protection policies are not required but can be added for additional protection.
Outlook Company contacts are searchable and incoming numbers are recognized.
The entire device can be wiped.
Setup:
1. Create a new Enrollment Profile–
Go to Devices-> Android-> Android Enrollment
Tap on Corporate owned devices with work profile

Click on Create Profile

Give your profile a recognizable and unique name. Fill in a description (optional) and press “Next”.

Select the Scope Tag (Optionally, apply any desired scope tags) and then select Next.

Review your settings and press Create to create the enrollment profile.

An enrollment token will be created. During enrollment this token is needed to let the users scan the code and enroll their device.


2. Create dynamic security group ,
3. Create a Device Restriction Profile (Check options available for COPE) and assign it to Security group
4. Create a Device Compliance policy .
5. Approve and assign Android and other applications
Device enrollment experience –Corporate-owned with work profile (COPE)- End User Device Enrollment Experience
Note: Android 8.0 or higher version.
Installation of applications is done without the need of a (personal) Google Play account. You`re signed in to the Google Play store with a Google for Work account automatically.
4. Android Enterprise Corporate Owned Dedicated Devices (COSU)
This mode is used for dedicated devices which are fully managed, but not assigned to a user.
Those devices are used for a single purpose, like ticket printing for example.
Setup:
1. Create an enrolment profile
Go to Devices-> Android-> Android Enrollment
Tap on Corporate owned dedicated devices.

Click on Create Profile

Give your profile a recognizable and unique name. Fill in a description (optional)
Choose the type of token you want to use to enroll dedicated devices (Note: A corporate-owned dedicated device token enrolls devices into a
userless state. The token with Azure AD shared mode does the same but also deploys the Microsoft Authenticator app and puts the devices in
shared mode so that users can have an easier sign-in/sign-out experience when using apps that are integrated with the Azure AD Microsoft
Authentication Library and global sign-in/sign-out calls.)
Set the expiration date for this token (The selected date can be a maximum of 65 years from the date of profile creation) and press “Next”.

Select the Scope Tag (Optionally, apply any desired scope tags) and then select Next.

Review your settings and press Create to create the enrollment profile.

An enrollment token will be created. During enrollment this token is needed to let the users scan the code and enroll their device
Open the Profile and Click the Token tab. Here you will find the token and QR Code you need during enrollment.
2. Create dynamic security group
3. Create a Device Restriction Profile (Check options available for Corporate owned dedicated devices) and assign it to Security group
Note – Creating and assigning a device restrictions policy is optional when using dedicated Android devices as those devices are already locked down by default.
4. Approve and assign Android applications
End-user experience – Corporate-owned dedicated devices(COSU)- End User Device Enrollment Experience
Note: Android 8.0 or higher version.
Create a kiosk style device, which further locks down the Android devices. A kiosk style device can be setup to only allow a single-app or multiple apps.
3. Android Open Source Project (AOSP)
The AOSP is an open-source operating system development project maintained by Google. Being open-source, anyone is free to review and contribute code and fixes to the project repository. … As well as being open to contributions, the Android Open Source Project is free to use and alter under an open-source license.
Device Management Solution/Method for Android Read More »